How to make a coil pot for beginners
Coiling is perhaps the most versatile of the hand building techniques because it allows you to build forms of any design or scale. It’s generally considered to be a slow and contemplative way of working which demands patience and attention to detail more than anything else. There are several methods of using coils but in this coiling project we will use the traditional method of rolled coils.
The right clay – tips
Clay used for coiling must be plastic, to prevent it cracking as you build the form – your pottery supplier will be able to advise on the best type of clay to meet your needs. Using a clay that has 20-30% grog will will increase its strength. Grog is clay which has been fired then ground up. It comes in many particle sizes, from fine to coarse. It is used to reduce shrinkage in clay bodies.
Smooth clays like porcelain are much harder to coil, so only use these for small items that can be built relatively quickly.
You will need
Scraping tools with different rounded edges are especially good for the insides of pots where there may be angles that are hard to get to. Old credit cards or gift cards are perfect for this. You can cut them in the shape of a kidney and work with them as well.
Loop tools are also really useful for removing large amounts of excess clay to reduce the thickness of the clay wall – a loop which is rounded at one end and pointed at the other is the best choice for the inside of larger coiled pots.
Outline former (see below)
Surform
Old Toothbrush
Surface Board or Bat to work on
Getting started – outline formers/templates
Before you start to build your coil pot you it is good to know what shape you intend to build – this sounds an obvious point to make but students often start to coil with no real idea of this and the shape of the pots looks can look unresolved as a result. This is not a necessity but if you are striving for a certain shape and it’s something to keep in mind.
The next step is to make the shape of the outline of the form that you intend to make because this will help you keep control of the shape as you build it.
The best material to use for the former from is thin MDF, which can easily be cut with a strong knife, but thick cardboard or bristol board will also work well.
• Draw the outline shape with a black marker pen – it’s easier to see than a pencil line when cutting out.
• The board should have a level base so that it can sit on the board that the pot’s made on, to keep the shape true.
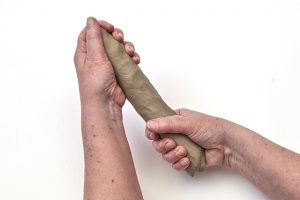
Roll your coil on a non-absorbent surface – melamine is good if you have some, but whatever you roll on it’s important that the coils don’t lose moisture at this stage.
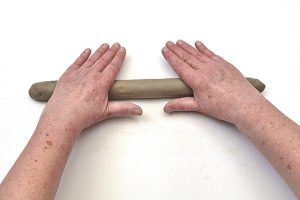 Roll with the palms of the hands, rather than the fingers which will make marks in the clay. Start in the middle and work outwards, rolling the clay back and forwards until it’s a thickness you’re happy to work with. A 10 mm thickness is about right to start with.
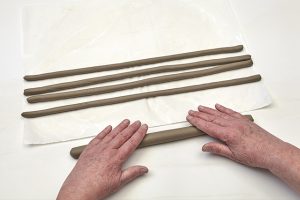
Roll several coils to ensure you can build your pot in one go, without having to stop to make more. Keep the rolled coils on plastic sheeting and cover with more plastic until ready to use to prevent moisture loss.
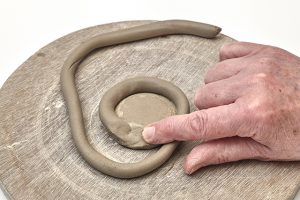
 Cut the base from a soft, rolled or pinched slab of clay using a cookie cutter to make an accurate disc. Make the base a little larger than required because some size will be lost when the first coil is attached.
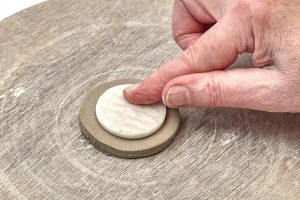
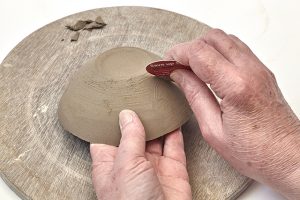
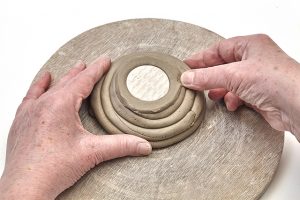 Create a foot ring by placing a small disc on the underside of the base slab. The disc can be purpose-made from bisque-fired clay, or you could use a large coin, flat button or a piece of bristol board. Turn the base over and place on a board –leaving the disc in place underneath.
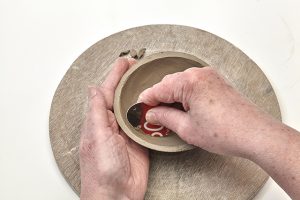
Attached the first coil, after scoring and slipping the edge of the base section. This will be periodically necessary at stages as the form builds up, but only if the clay is too firm to blend easily. Begin by blending one end of the coil down onto the base carefully.
Scoring a pot or piece of clay means to scratch hatch marks on it as part of joining clay pieces together. Slip generally is used to describe any clay in liquid form. The process is often called score and slip.
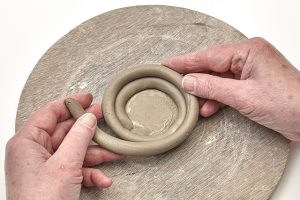
Supporting the form by cupping the side in one hand, carefully blend the coils into one another and onto the rest of the base. Blend the clay downwards using a thumb, finger or wooden tool.
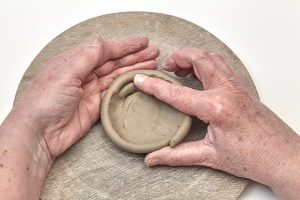
When the coil has been blended in on the inside of the form, turn it over and repeat the blending process on the outside, taking care not to squash the form. This is easier if you hold the shape in one hand as you blend with the other.
Remove the disc from the base and very carefully refine the surface using a metal or plastic kidney to remove lumps and bumps and smooth the surface.
At this stage you can use a wooden spatula to paddle the surface of the pot to correct the shape and help compact the clay and ease out any irregularities in the surface if you aren’t happy with the shape.
Repeat the smoothing and blending process on the inside using a small plastic kidney to remove excess clay.
Check the shape of your pot so far, by holding the outline former flat on the board the pot is sitting on, then drawing it carefully around the form. It will help if the board is sitting on a banding wheel or lazy susan to do this. If you would like to make any corrections to the form, this would be a good time to do this. By doing this regularly you’ll maintain control over the pot if that is what you are striving for.
Score and slip the rim of the pot, then continue to build up the shape in the same way until it reaches the desired shape and height.